So we have successfully managed to deploy our NextCloud instance on top of Docker Swarm. So, what to do next? NextCloud Talk!
Similar to Jitsi that I have covered many moons ago, NextCloud Talk (previously Spreedme) is HTTP based audio and video conferencing solution based on WebRTC. If you and your team relies heavily on video conferencing, and you’re not too fond of what Zoom is doing with your data, you might want to take a look at NextCloud Talk
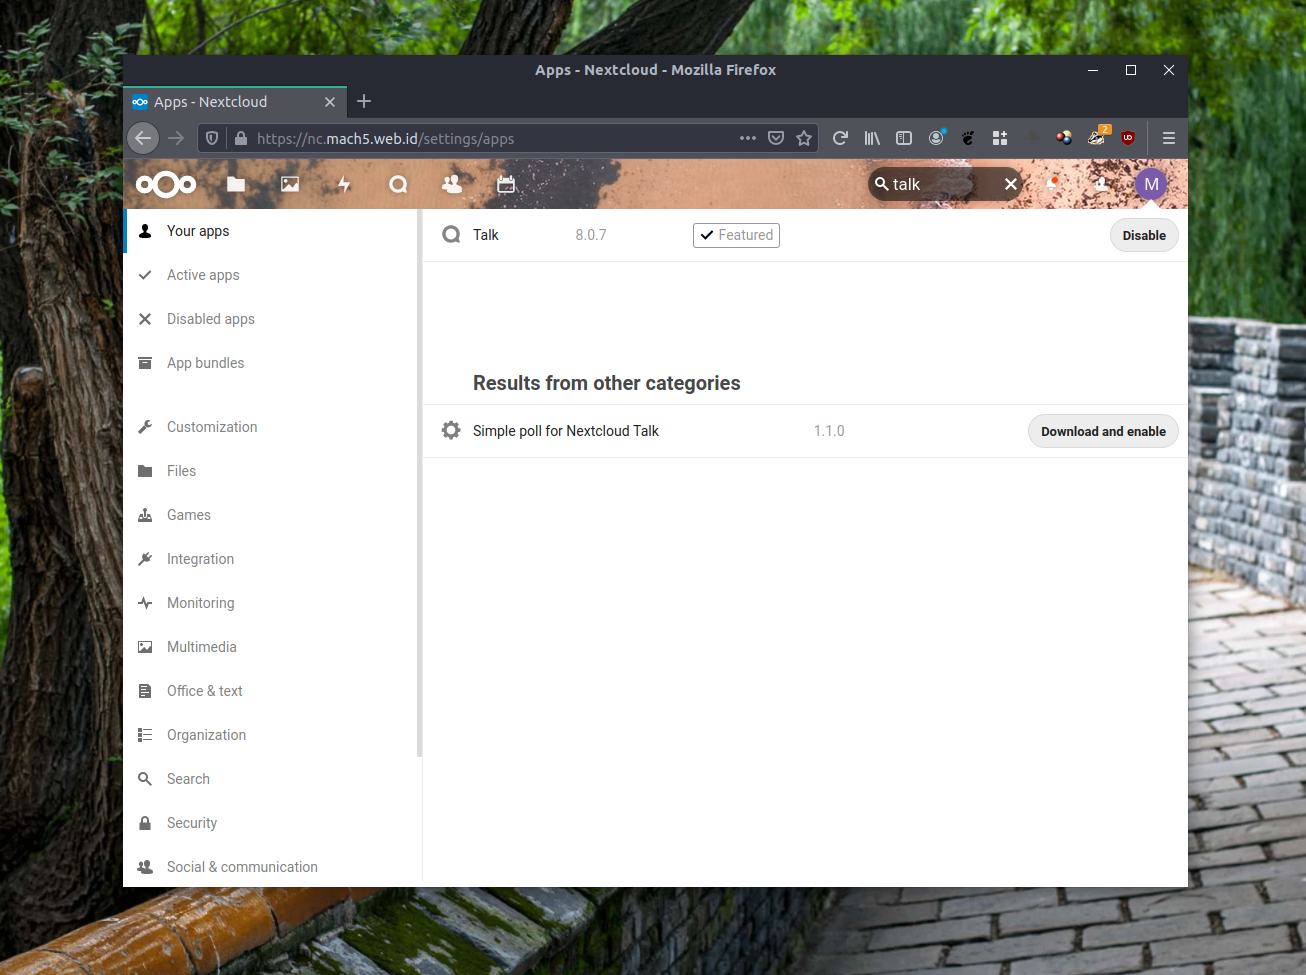
Enabling Talk on your NextCloud instance is very easy. Log in as administrator, click on your icon, and on the drop down menu, click on “+ Apps”. You’ll be transported to “Your App” page. Look for the search bar, and type “talk”. Press the “Download and Enable” button to …download and enable NextCloud Talk module. You can now start a conference among your NextCloud users, or create a conference room and share a link to the room so anyone with a browser can join in

..and you’re done, right?
Not quite. Enabling the Talk component provides you with video and audio conference, as long as the participants are on the same LAN. To be able to serve conferences to anyone, whether they are in your private LAN or the internet, you need to have a TURN and STUN servers that relay and work around your NAT limitations and filters. In our case, we can install both components in one of our docker swarm hosts. You can either incorporate this to your existing NextCloud stack, or create a separate service, as this article will show you how to.
Prereqs
You can refers to the first part of my NextCloud series for prerequisites for our deployment. On the network side, open at least 2 unused ports on your firewall, in this case, I’m using TCP 5349 and 3478
Configuring the node(s)
Building on top of our previous deployment, here’s how I set my directory structure:
mkdir /data/nc/coturn
mkdir /data/nc/coturn/conf
mkdir /data/nc/coturn/certs
The next thing we need to do is to copy your fullchain certificate and private key to /data/nc/coturn/certs.
Next, if you’re integrating this to the swarm we’re using on the previous project, then you should already have an overlay docker network ready. If not, do:
sudo docker network create --driver=overlay nextcloud_external
The Stack
The stack is a lie, as in there is no stack, as the service will run exactly one component, the coturn server
version: "3.3"

services:
  coturn:
    image: "cybergatelabs/coturn"
    networks:
      - nextcloud_external
    ports:
      - "3478:3478"
      - "5349:5349"
    volumes:
      - "/data/nc/coturn/certs/:/certs/"
      - "/data/nc/coturn/conf/turnserver.conf:/etc/turnserver.conf"
      - "/data/nc/coturn/conf/coturn:/etc/default/coturn"
    deploy:
      placement:
        constraints:
          - node.role == manager
networks:
  nextcloud_external:
     external: true
Save the file somewhere.. safe. I name it docker-compose-coturn.yaml
Then, some additional steps:
First, do:
sudo nano /data/nc/coturn/conf/coturn
And add this single line:
TURNSERVER_ENABLED=1
Next, create an adequately long random strings, you can use this command as an example
cat /dev/urandom | tr -dc 'a-zA-Z0-9' | fold -w 64 | head -n 1
Next, do:
sudo nano /data/nc/coturn/conf/turnserver.conf
Place the previously generated string to on static-auth-secret parameter. Determine whether your docker node’s public IP is directly attached to your node, or whether it uses NAT. Mine has it directly attached as one of the interface, so this is how mine looks like:
listening-port=3478
tls-listening-port=5349
fingerprint
use-auth-secret
static-auth-secret=NQ9YugnI1sk47b1U6LMunCLUGpyn0uoDOHZJdmeHa7F4KDcJ7KsD1kLmqwZBfhXW
realm=nc.mach5.web.id
total-quota=100
stale-nonce
cert=/certs/fullchain.pem
pkey=/certs/privkey.pem
cipher-list="ECDH+AESGCM:DH+AESGCM:ECDH+AES256:DH+AES256:ECDH+AES128:DH+AES:ECDH+3DES:DH+3DES:RSA+AES:RSA+3DES:!ADH:!AECDH:!MD5"
no-loopback-peers
no-multicast-peers
no-tlsv1
no-tlsv1_1
If your node instead is NATed to the internet, you might have to modify your turnserver.conf to look like this:
listening-port=3478
tls-listening-port=5349
listening-ip=your.private.ip.address
relay-ip=your.private.ip.address
external-ip=your.public.ip.address/your.private.ip.address
fingerprint
use-auth-secret
static-auth-secret=NQ9YugnI1sk47b1U6LMunCLUGpyn0uoDOHZJdmeHa7F4KDcJ7KsD1kLmqwZBfhXW
realm=nc.mach5.web.id
total-quota=100
stale-nonce
cert=/certs/fullchain.pem
pkey=/certs/privkey.pem
cipher-list="ECDH+AESGCM:DH+AESGCM:ECDH+AES256:DH+AES256:ECDH+AES128:DH+AES:ECDH+3DES:DH+3DES:RSA+AES:RSA+3DES:!ADH:!AECDH:!MD5"
no-loopback-peers
no-multicast-peers
no-tlsv1
no-tlsv1_1
The three additional lines should tell our coturn server that it’s on NAT and act properly.
Deploying The Stack
We can now start our stack by running:
sudo docker stack deploy --compose-file=/data/nc/docker/compose/docker-compose-coturn.yaml coturn
Check whether the instance is running properly:
surfer@NC03:~$ sudo docker service ls
[sudo] password for surfer:
ID                  NAME                MODE                REPLICAS            IMAGE                         PORTS
y48ucow20zlv        coturn_coturn       replicated          1/1                 cybergatelabs/coturn:latest   *:3478->3478/tcp, *:5349->5349/tcp
gikc9dew046v        next_app            replicated          1/1                 nextcloud:latest
gt146t7osdji        next_db             replicated          1/1                 mysql:5.7
6hbf72qvw6yh        next_traefik        replicated          1/1                 traefik:v2.0.0                *:80->80/tcp, *:443->443/tcp, *:8080->8080/tcp
You should now have a ready to use TURN & STUN server. Let’s setup our NextCloud to use them. Log into NextCloud with an admin account, and click your icon to open the dropdown menu and click “Settings”

Find the Administration menu on the left side of the console, and click on “Talk” to open the configuration page for Talk, and fill in our server info:

Fill in “Secret” with our random string, and press the pulse icon on the left side of the trashcan icon to test our configuration. If it’s OK, a check mark will appear.

Once it’s done, you are ready to do video conferencing from with anyone, anywhere