So you have built a webservice that do certain things on transaction model. Then you need to do the exact same thing, but instead of realtime, you need in a batch, processing certain amount of data at once, instead of one data per-request. Should you devise another application or system that does the exact same thing that your webservice do? Sure. Or, you can put the data inside a text file, and pass it to your webservice.
Passing a text file to webMethod Integration Server can be accomplished in several method. In this article, I’ll be using the simple public.file.getFile function.The public.getFile function allows webMethods IS to read file that you put somewhere inside the IS server’s file system, or on a mounted nfs server. I don’t know whether it also work with Windows’ network drive.
The second component, or rather, a group of components that we will be discussing next is the Flat File Directory, theFlat File Schema, as well as the IS document that will store and determine the structure of the data
The last component is the pub.flatfile.convertToValues. The pub.flatfile.convertToValues takes the data captured by public.file.getFile, and pass it to the previously mentioned IS document.
So first thing first, creating the flat file directory, flat file schema, and the IS document. Create a folder for the Flat File Directory and schema. Right click on the folder and select new, and then select Flat File Directory. Right click on Record Definition and select New. Name the new Record Definition and click finish. Then right click on the newly created Record Definition, then select new to create new element. Select Field definition, and press next. On the next dialog, change the Extractor type to “Nth Field”. There is a group of three buttons on the right side of the window. Click the most top to add a row. Add rows as much as our CSV file has. If your CSV has 3 fields, then add 3 new rows, with the first row having “0” to its’ position, and the last one being “2”. Name the rows accordingly, and then press finish. Save your work.


Go back to the folder for the Flat File schema, and right click, go to “New” and select Flat File Schema to create a new Flat File Schema. Name it, and press finish. On the newly created Flat File schema, select “Delimiter” on “Record parser type”, select “new line” on “Record” delimiter, and type “,” for the “Field or composite” delimiter.

Leave the rest as is, then go to Flat File Structure tab. Go to “Properties” on the left pane, and look at the Default Record portion. Tap the button the “Set” option, and navigate to the previously created Flat File Directory, press next, select the Default record, then click “Finish”. If you failed to save your work after creating the flat file directory, the options for the default record will be empty, so never forget to save your work. There is never been a better time to save your work like present, so hit that button right now!

Go back to the Flat File schema, and highlight the only entry on the table then press the “Create Document Type” at the top bar.

We’ll then be presented with a new Document Type that has the exact same structure of the flat file directory that we have created on the previous step. If you forget to save your work before pressing the button, You’ll be presented with a document without structure, so make sure to hit that save button.

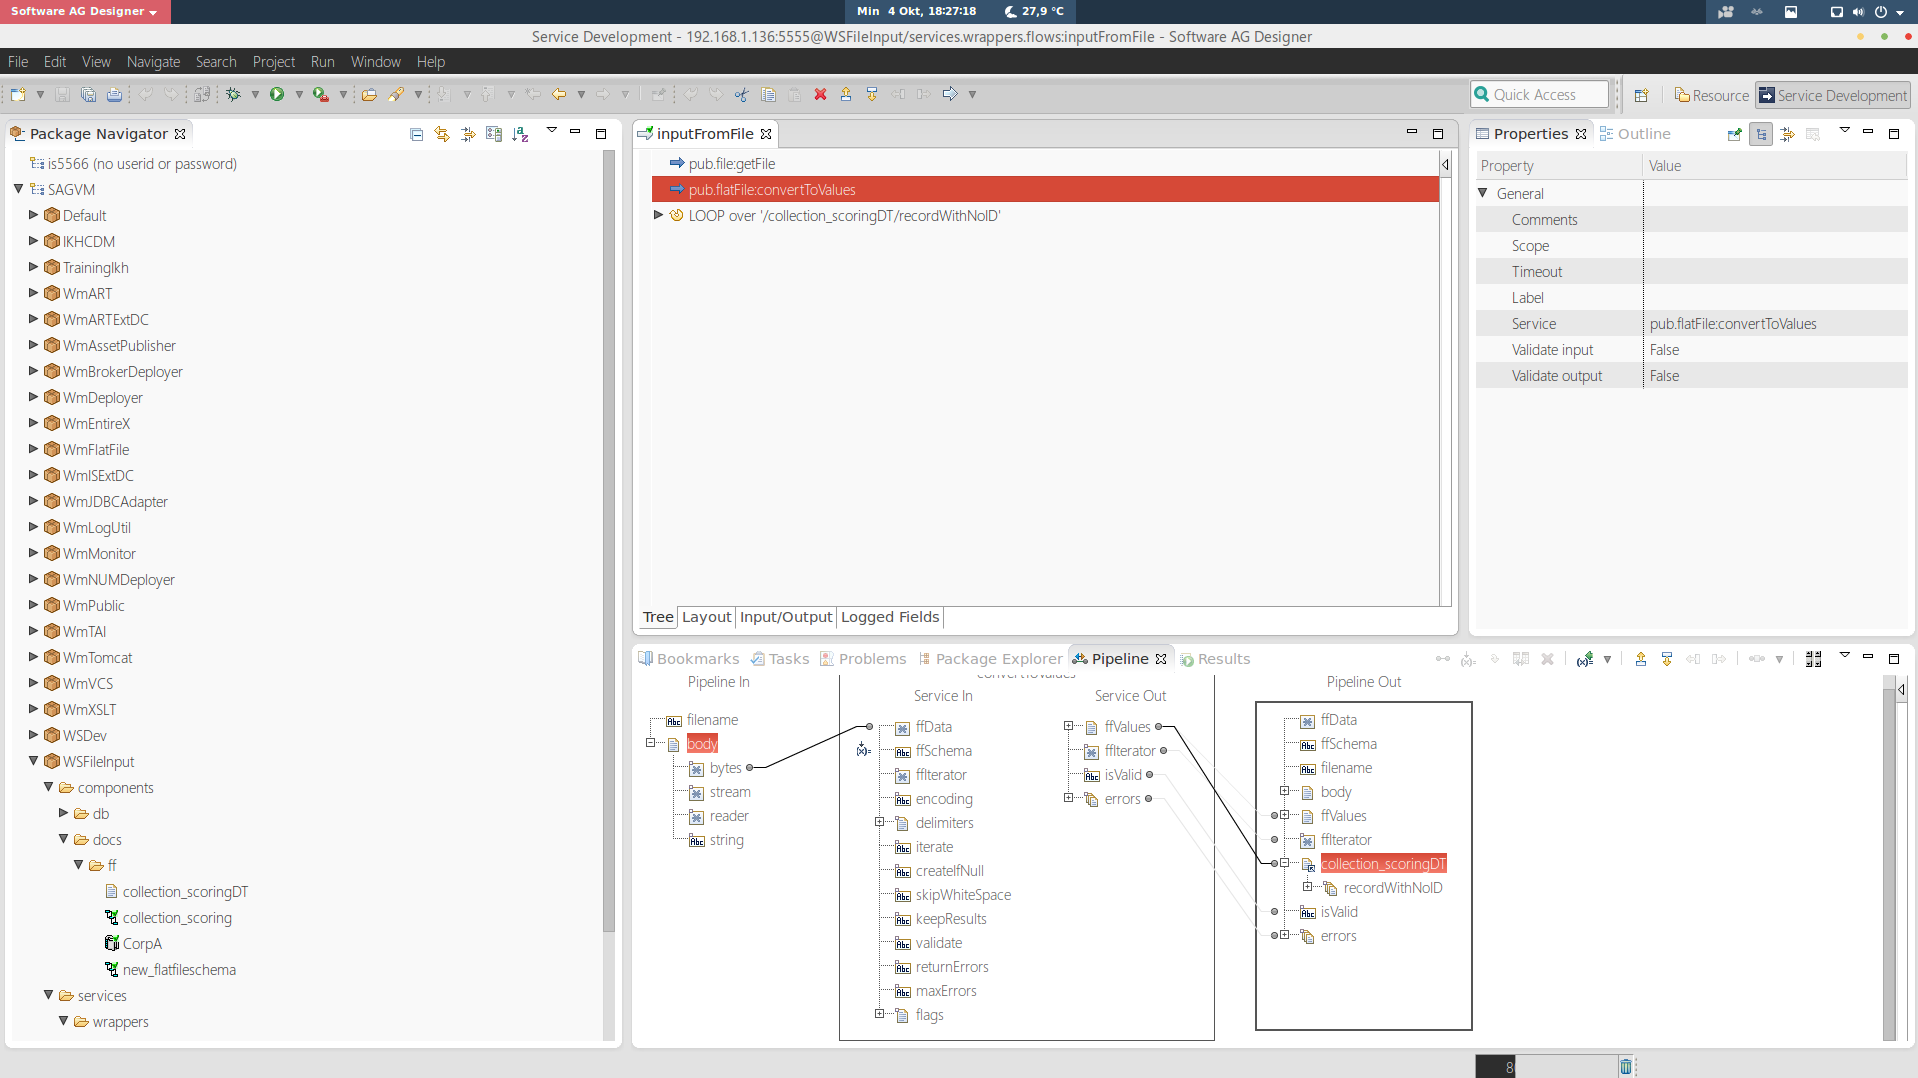
Now that we are done with the preparation, go to the folder where you’re planning to put a flow service, right click, select new, and click Flow Service to create a new Flow Service. Go to the newly created flow service, and drag “Invoke…” to the Flow Service. On the “Select…” window, navigate to WmPublic>pub>file, and select getFile to insert the public.file.getFile function to the service. Go to the “Pipeline” tab, and double click “filename” to insert a value, which is the path to the csv file. Leave everything else as is.


Now, drag “Invoke…” again to the pane, and this time navigate to WmFlatFile>pub>flatFile, and select “convertToValues”, then press OK to add the pub.flatfile.convertToValues to the service. Go back to the Flat File folder, right click on the Flat File schema, and select “Copy”. Navigate to the pub.flatfile.convertToValues’ pipeline, double click on ffSchema to give it value. Right click and select paste to put the path of our Flat File schema to it.

Next, drag the document created from the Flat File Schema to the “Pipeline out” to add a new document element on the pipeline. Rename it accordingly. Do the mapping as follows:

Then save. If you run the service, the data from the csv file should be captured on the document. You can now use it as you see fit. It is really a very simple process, and I have created a video to as a companion to this small how to. It’s in 1080p, so if you find the font a bit too small, please watch it in full screen:
Thank you for sharing the example. I have a question though.How do you parse CSV flat file in webmethods when the fields contain comma in them. Kindly help me.
..And thank you for your comment 🙂 You can use release character (on my example below, it is “\”) on every instance of comma is used not as field separator. It can be set either on the flat file schema
or when setting up the pub.flatfile.convertToValues.

So your csv file should look like this:
With the first field for each records’ value being “Winchester, Dean” and “Winchester, Sam” for record 1 and record 2 respectively
Thanks ikhsan for your prompt reply. I have tried what you have advised. My data was -12345,John Smith,”123\, Main St”,San Francisco,27262. I gave my release character as \ but now all my data is read into first field of record.Is there something I am missing?
If you want to use the quote marks (“”) on your csv, you need to use “Quoted release character” on your flat file schema instead of “Release character”. Otherwise, you can remove them from the line.
So if you want to use release character, your line would look like this:
…And if you want to use quoted release character, that line should look like this:
Thank you so much. It worked 🙂
Great! 😀