So I decided to spend my Ied bonus to beef up my PC audio setup. To do this, I need:
- At least 5.1 capable sound card. Since I’m going to hook this up on my Vaio, VPCEA36FG, USB connectivity is a must
- A 5.1 speaker set, analog or digital
After a bit of googling and browsing, I have two choices for sound card. The first one is Creative Sound Blaster X-Fi 5.1 Surround Pro, and the second one is a cheap C-Media 5.1 external sound card. I heard much success with the later, while installing the former might require me to ditch Pulse Audio, updating ALSA, etc etc. Also I can’t find a single forum post regarding the X-Fi and Maverick. There are a lot of posts about the X-Fi with Jaunty or Lucid, but no Maverick.
Anyway, finding shops or stores that sell the C-Media or the X-Fi card turned out to be quite a task. The X-Fi has not been in stock for quite sometime, and my search for the C-Media on every local brick and mortar and online shops in Indonesia, came out with empty. At the end, I asked a friend to get me the C-Media via dealextreme.com (since I don’t own a credit card)
Next, the speakers. There are several choices available on my price range from Creative, Edifier and Logitech, and I went with Logitech Z506. It’s cheap and quite easy to setup, and has a very decent sound output for the price. Plus, it support multiple inputs, so I can hook up the 36GF and my TV at the same time. Luckily, during my speaker hunt, I found one shop that carry the X-Fi 5.1!
Setting up the Logitech Z506 is very easy and straight forward, since everything is color coded. The Z506 can accept sound input via 2 RCA connector or from 1 (for stereo) or 3 (for analog 5.1 Surround) audio jacks from a sound card. Connecting the front audio jack to the 36FG internal sound card produced stereo output from all of the satellites, so everything is working. Next, surround sound
The X-Fi SP 5.1 connects and draws power via USB, so you need to plug it directly to the notebook, or like me, hook it to a powered USB hub ( mine is a Roccat Apuri). The X-Fi should be automatically detected by Maverick, you can check it by typing “lsusb”
ikhsan@Mach5-NX:~$ lsusb
Bus 002 Device 118: ID 046d:c52b Logitech, Inc. Unifying Receiver
Bus 002 Device 117: ID 1058:1102 Western Digital Technologies, Inc.
Bus 002 Device 116: ID 041e:30df Creative Technology, Ltd
Bus 002 Device 115: ID 05e3:0608 Genesys Logic, Inc. USB-2.0 4-Port HUB
Bus 002 Device 002: ID 8087:0020 Intel Corp. Integrated Rate Matching Hub
Bus 002 Device 001: ID 1d6b:0002 Linux Foundation 2.0 root hub
Bus 001 Device 004: ID 0489:e00f Foxconn / Hon Hai
Bus 001 Device 003: ID 0c45:6409 Microdia
Bus 001 Device 002: ID 8087:0020 Intel Corp. Integrated Rate Matching Hub
Bus 001 Device 001: ID 1d6b:0002 Linux Foundation 2.0 root hub
or go to System > Preferences > Sound, and open the “hardware” tab. The X-Fi is listed, but on the profile dropdown menu, you will see that no profile for 5.1 sound is available… yet.

To make things easier, install the Pulseaudio Volume Control by opening terminal, and do:
ikhsan@Mach5-NX:~$ sudo apt-get install pavucontrol
Next, edit the /etc/pulse/daemon.conf
ikhsan@Mach5-NX:~$ sudo nano /etc/pulse/daemon.conf
Find “; default-sample-channels = 2” and change it to “; default-sample-channels = 6”, save, and restart Pulseaudio. Open the “pavucontrol” by pressing Alt+F2, and type “pavucontrol”. On the configuration tab, select “Analog Surround 5.1 Output + Analog Stereo Input” for the X-Fi profile. You can also do this via Sound Preferences.

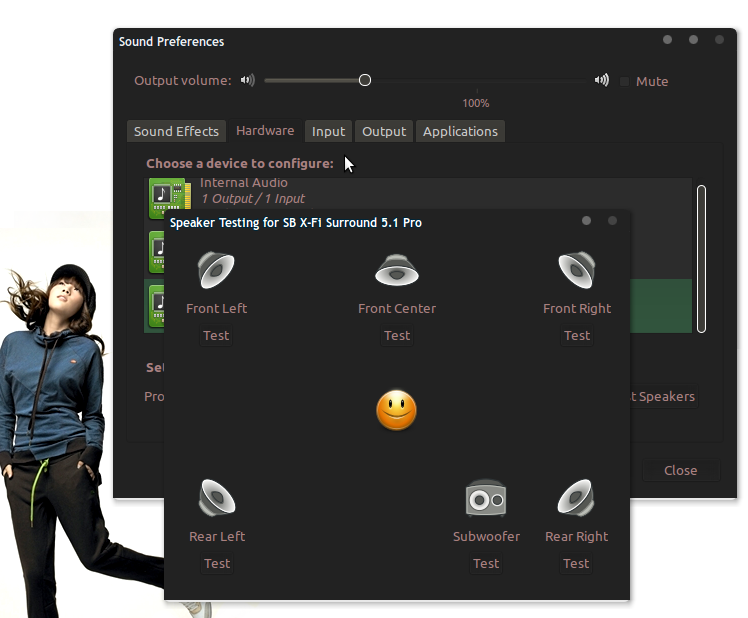
..Next, connecting the X-Fi to the Z506. This is straight forward, as everything is color coded. Connect all of the three audio jacks from the Z506 to its corresponding port on the X-Fi. Now to test the 5.1 output, open System > Preferences > Sound, select the hardware tab, select the X-Fi from the list, make sure the 5.1 Surround profile is selected, and then press the “Test Speakers” button. Press each “test” button to test all of the speaker components

..And done. To set the X-Fi as the default sound output, go to System > Preferences > Sound, and select the X-Fi on the output tab.

To individually set the output level of the satellites and the sub, open “pavucontrol”, and find the X-Fi entry on the “Output Devices” tab

Next on the list is to try some 5.1 encoded videos. I’ll report back as soon as I’m done! 🙂